How to Make a Personalized 3D-Printed Name Sign (Letter, Heart or Any Shape)
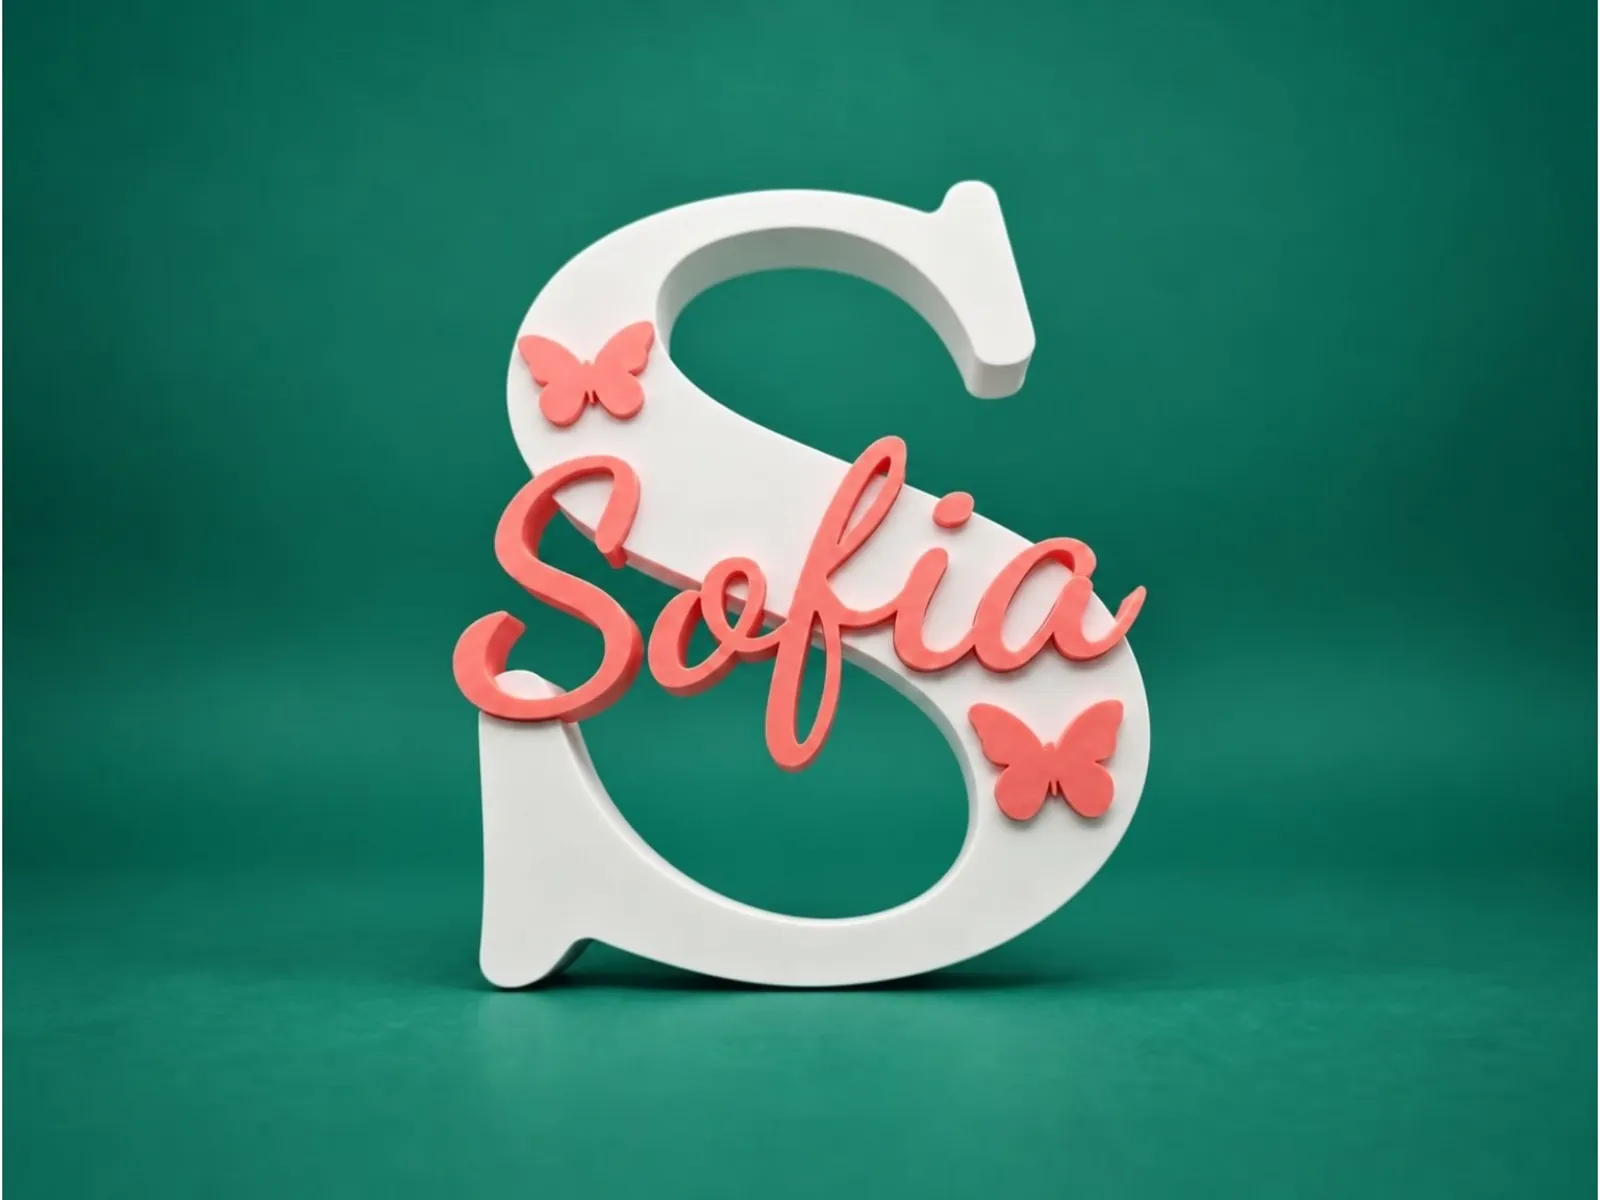
A name sign that holds a name inside a big initial, a heart or a paw print is one of the most popular things to make with a 3D printer: a gift for a baby’s room, a desk nameplate, a wedding table sign. The Name Sign tool makes the base, the recess and the inlays, and exports a file that opens already painted in your slicer. This guide takes you through the choices and the printing.
The idea
The sign has a base, a large letter or shape, with a recess milled into its face. Each name and each icon is a separate inlay piece that sits in the recess in its own colour. The result looks like a one-piece sign with names written in colour, but each colour is a part you can change.
Step 1: the base
- Enter a main letter, which is the usual choice for a name sign.
- Or choose an icon, such as a heart, a star or a paw print, from more than 2,000 Material Icons.
- Or upload your own SVG. It needs filled shapes.
A bold, simple letter gives the most room for names. A letter with thin parts, or a very decorative shape, leaves less room, and the names must be smaller.
Step 2: names and icons
Add one or more names and icons. Each gets its own font, size and colour. There are 58 fonts, including 29 illustrated alphabets (animals, princesses, Halloween and more), and you can upload your own .ttf. A name in an illustrated font keeps the shapes of the letters in one colour. Used for the big letter, an illustrated font inlays the drawing in its own colours, one piece per colour.
Pairing fonts
- Use one expressive font and keep the others simple, so the sign does not look busy.
- Give the main name the largest size and the boldest font.
- Use a clean, readable font for dates and small text.
Step 3: sizes and depth
Set the letter height, the sizes of the inlays, the depth of the base and the depth of the inlay in millimetres. You can drag pieces into place. A shallow inlay is quick to print and a deeper one is stronger. Keep names large enough to print cleanly: very fine strokes at small sizes may not print well on a 0.4 mm nozzle.
Step 4: colours and export
Choose the colour of each part. You can download a colored 3MF, an STL, a parts ZIP or OpenSCAD source. The 3MF opens painted in Bambu Studio and similar slicers; see the multicolor 3MF guide for each slicer.
Choosing colours that work
- Contrast first. The name must stand out from the base: light on dark or dark on light.
- Two or three colours look cleaner than six, and print faster.
- Match the room. For a nursery, soft pastels; for a desk, a single accent colour on white or black.
- Check your colours in the preview before you download.
Printing tips
- 0.16 to 0.20 mm layers, 15% gyroid infill and 3 perimeters.
- PLA for indoor signs; PETG for pieces that have to last.
- Print face-down with no supports; turn on ironing for a smooth top.
- If you have a single extruder, print the parts separately and glue them.
If you print the parts separately
- Print the base and each inlay as its own file from the parts ZIP.
- Test-fit an inlay in the recess before gluing. If it is tight, sand the edge lightly.
- Glue each inlay into its recess with a few dots of super glue or a plastic-safe adhesive; do not flood the recess.
- Press the inlay flat and let it set. Wipe off any glue that squeezes out.
Ideas
- Nursery decor: the baby’s initial with the full name and a few icons.
- Desk nameplates: one name in a clean font.
- Weddings and parties: a heart with two names and a date.
- Made-to-order gifts: a base shape that matches the person’s hobbies, with their name inside.
Display
A name sign sits well on a shelf or desk, or can be hung. For a flat back, print face-down as recommended; the back is then the smooth bed side. To hang, add a small hole or use adhesive hanging strips on the back. For a free-standing sign, a small stand or a wider base helps.
Questions people ask
What are the illustrated fonts?
29 hand-drawn alphabets such as animals, princesses and Halloween. Used for the big letter, the drawing is inlaid in its own colours, one piece per colour. Names in an illustrated font keep the letter shapes in one colour.
Can the base be a shape instead of a letter?
Yes. Choose a heart, a star, a paw print or any icon, or upload an SVG. The name is inlaid into the shape.
Which print settings work well?
0.16 to 0.20 mm layers, 15% gyroid infill and 3 perimeters. PLA indoors, PETG where it must last, face-down and no supports, with ironing for a smooth top.
How big can the sign be?
As big as your printer’s bed allows. The tool sets sizes in millimetres, so you can check the size against your bed before you download.
Keep reading
Multicolor 3MF Files: How to Print Names in Colour in Bambu Studio, OrcaSlicer, Cura and PrusaSlicerWhat a multicolor 3MF is, how each slicer reads it (Bambu Studio, OrcaSlicer, Creality Print, Cura, PrusaSlicer), how many filaments you need and what to do on a single-colour printer. 3D-Printed Name Beads and Charms: Cord Holes, Colours and PrintingMake letter beads and charms for bag charms, keychains and bracelets: choose the style, cord hole size, colours and charms, and print without supports.
 Calibrate Your Printer for Tight Fits: Strips, Joints and LampholdersHow to measure and fix dimensional accuracy so printed slots, dovetails, joints and lampholder bores fit: calibration prints, flow, first layer, horizontal expansion and clearance.
Written and checked by the Volucore team against the behaviour of our tools. Spotted a mistake or something out of date? Tell us and we will fix it.